
Build a RAG Chatbot For Your Shopify Store
Best GPTs Developer
538 words
Leverage Embed’s AI for Superior Customer Support on Shopify
Boost your Shopify store’s customer support and engagement with Embed’s AI chatbot, powered by the innovative llama-2 model. This integration offers an efficient and cost-effective solution to provide 24/7 customer service, ensuring your e-commerce platform stands out in a competitive market.
Benefits of Integrating an AI Chatbot with Your Shopify Store
Incorporating a chatbot into your Shopify store offers numerous benefits:
- Instantaneous Support and Engagement: Deliver immediate customer support, enhancing the shopping experience.
- 24/7 Availability: Your store remains responsive at all times, improving customer satisfaction and loyalty.
- Increased Sales: Engage customers with quick responses, reducing potential sales losses due to delayed support.
How to Add an AI Chatbot to Your Shopify Store
Integrate the Embed Chatbot for free using these steps:
-
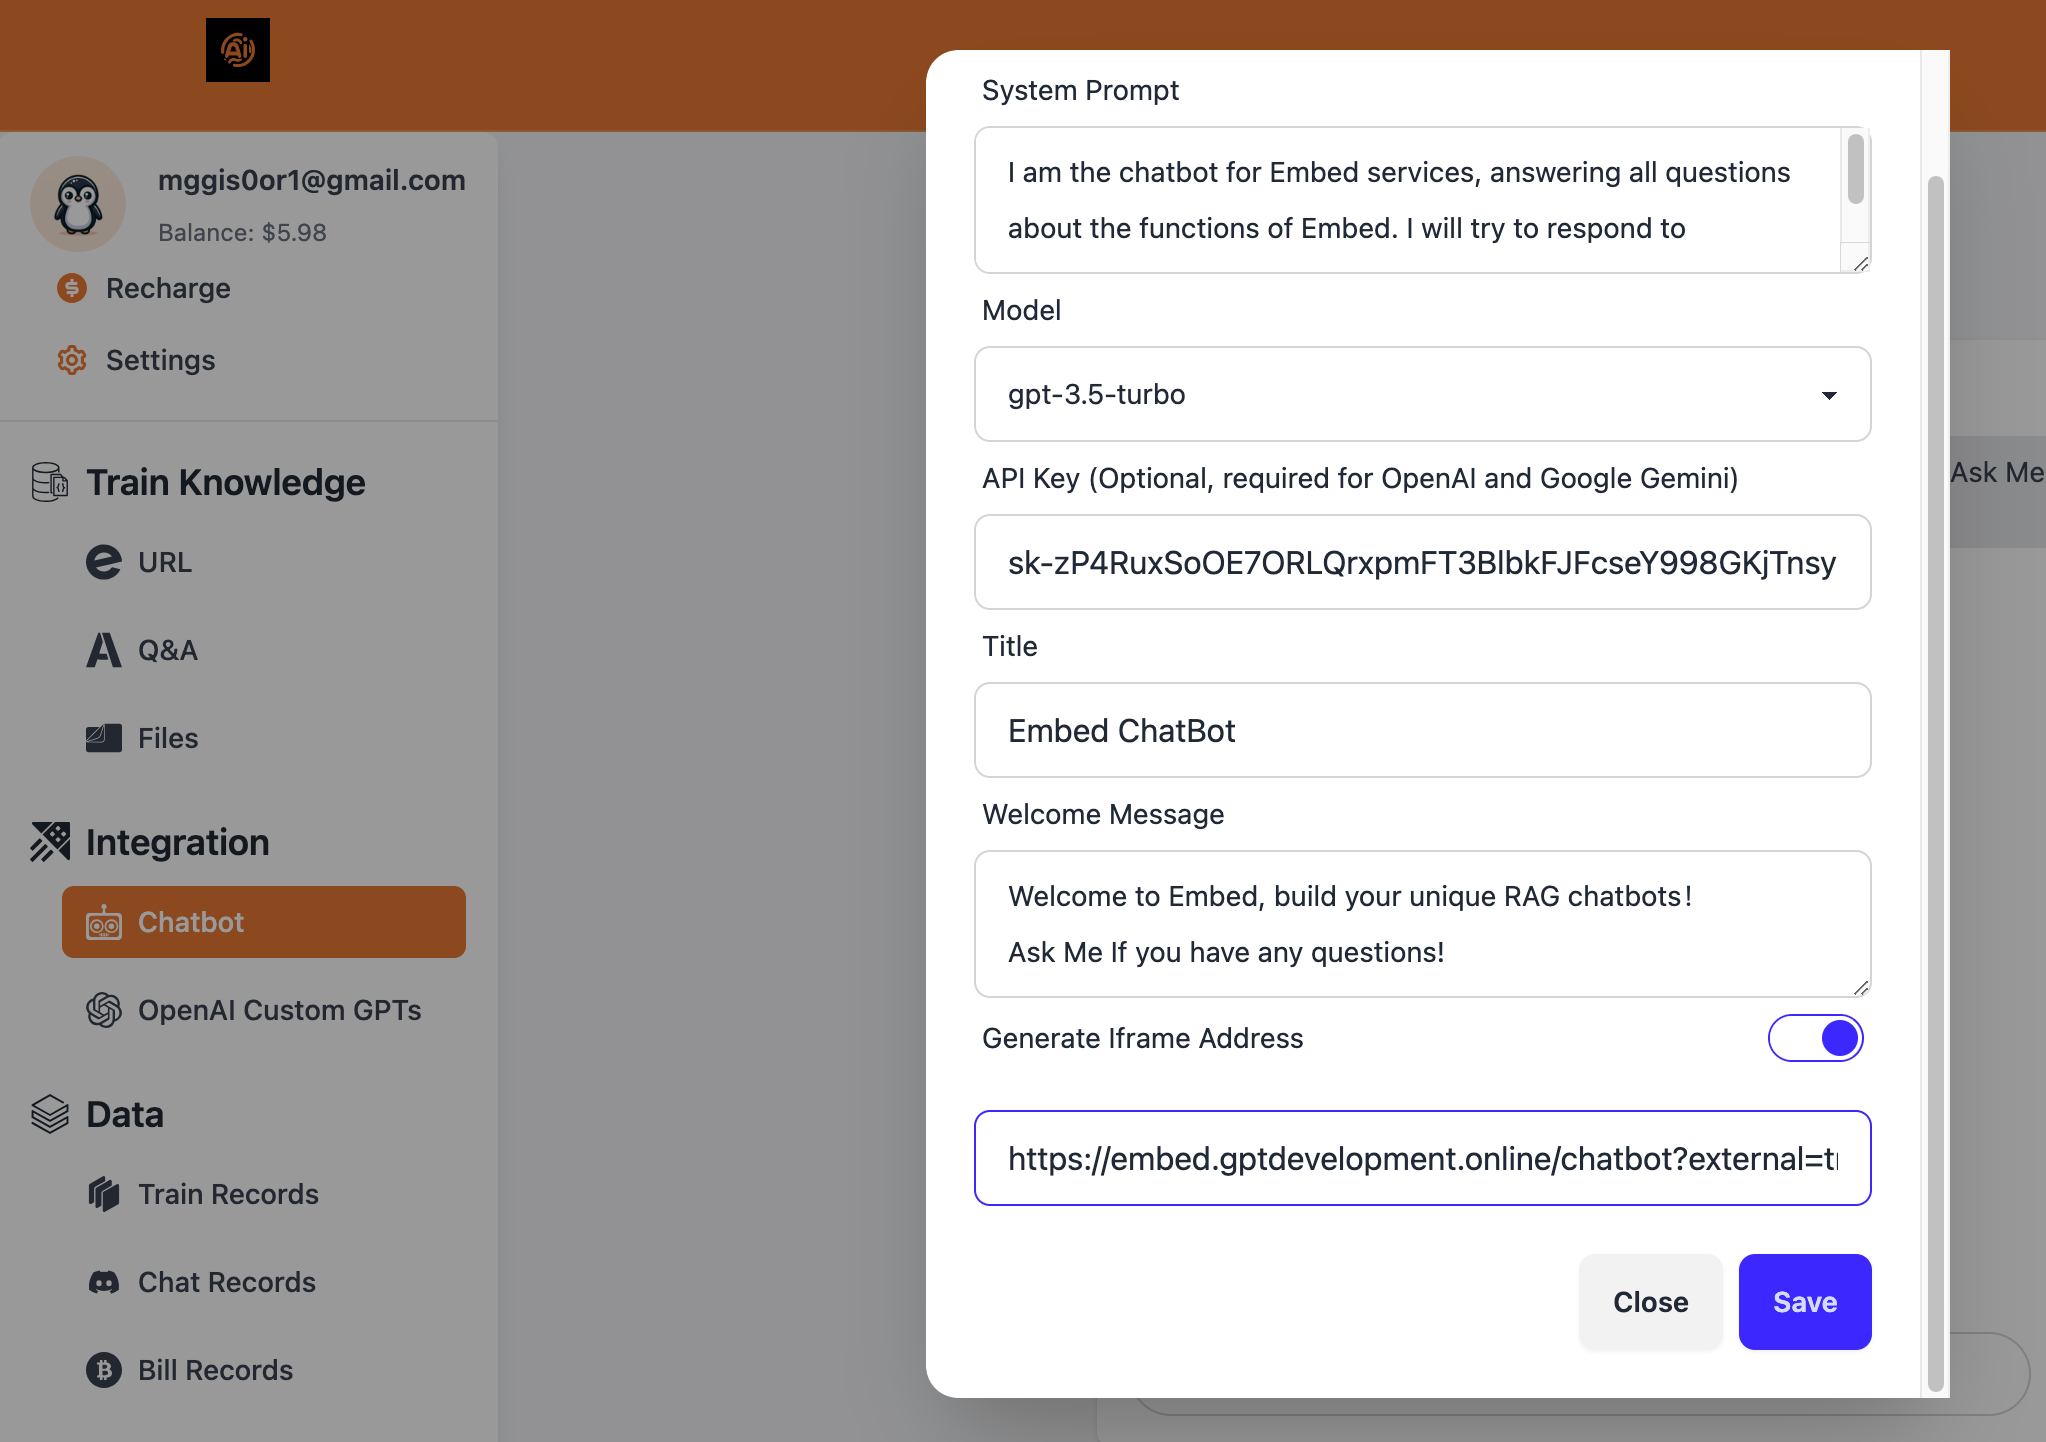
Set Up Your Embed Account: Customize your chatbot to your store’s needs at Embed’s chatbot settings page. Configure your chatbot’s system prompt and model, then copy the iframe code and save.
-
Copy the Iframe Code: Secure the chatbot embed code.
-
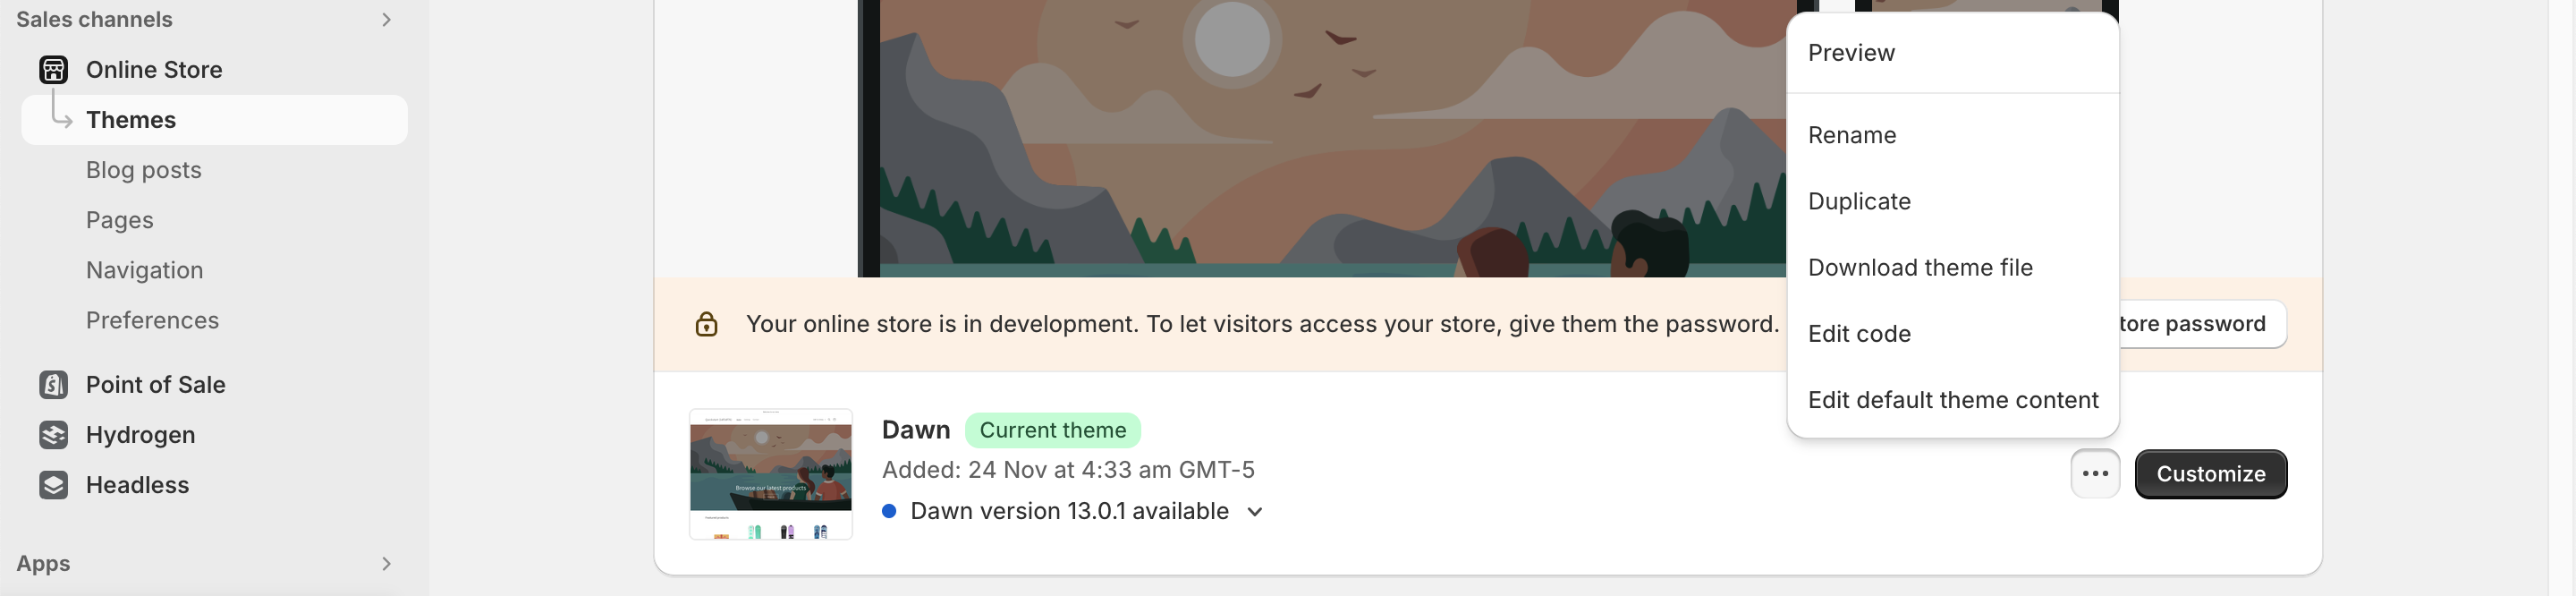
Navigate to Shopify Dashboard: Log in and go to ‘Online Store’ under ‘Sales channels’.
-
Customize Theme: Select ‘Edit code’ from the theme menu.
-
Access
theme.liquidFile: Find this file in the code editor. -
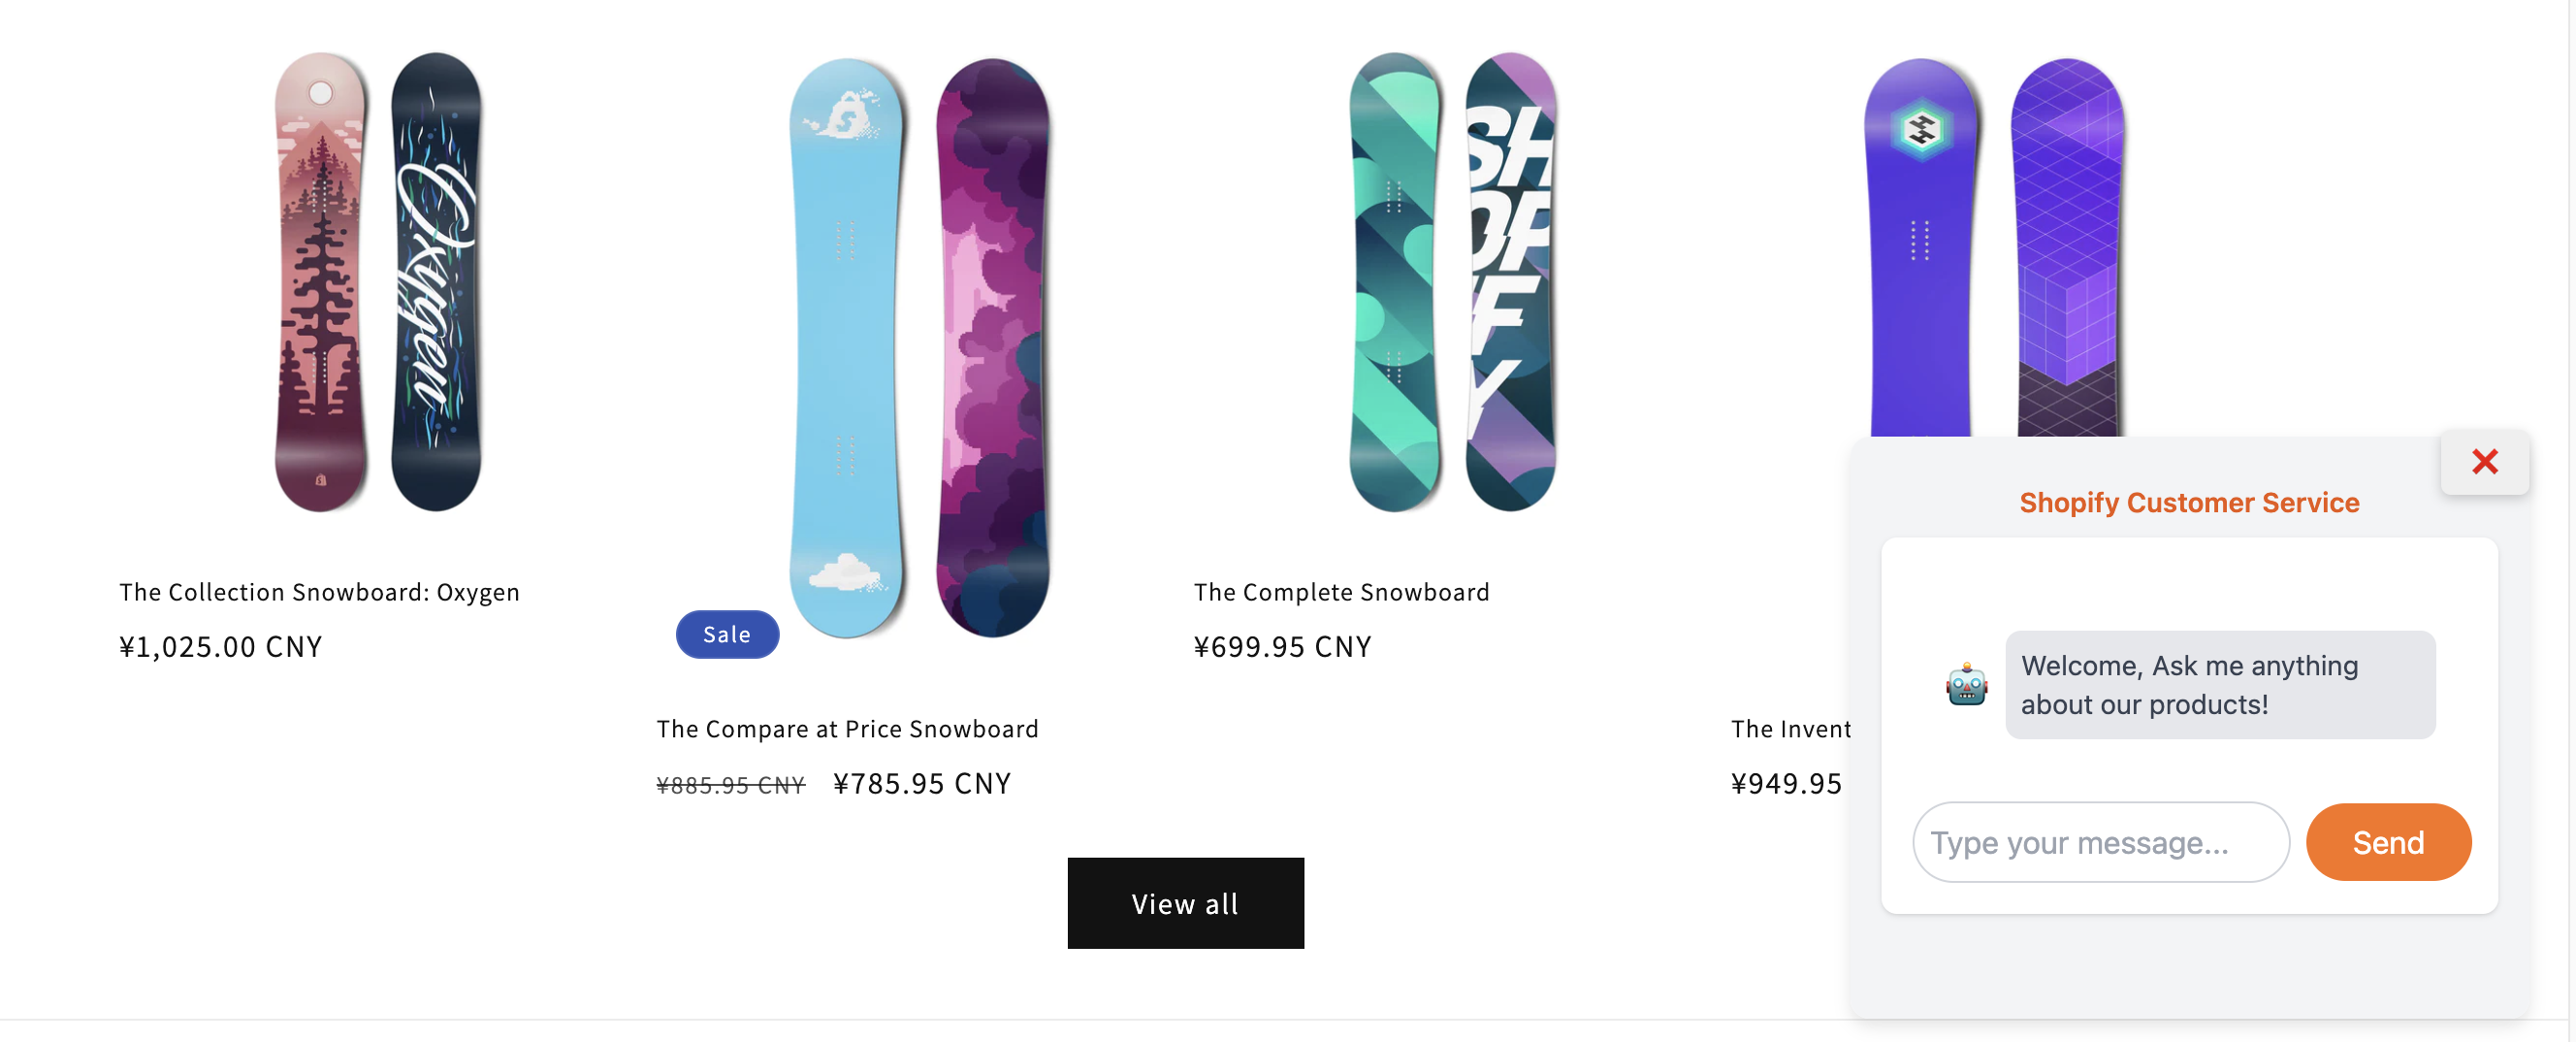
Embed Chatbot Code: Insert the iframe code into the
theme.liquidfile within thebodysection, replacing<YOUR_CHATBOT_IFRAME>with your iframe link.<!-- Customer Service Chatbot iframe --> <iframe id="customer-service-bot" src=<YOUR_CHATBOT_IFRAME> style="position: fixed; bottom: 20px; right: 20px; width: 380px; height: 300px; border: none; border-radius: 10px; background-color: rgba(128, 128, 128, 0.5); box-shadow: 0 4px 8px rgba(0, 0, 0, 0.1); transition: bottom 0.5s, opacity 0.5s; z-index: 1000;" sandbox="allow-scripts allow-same-origin allow-forms"> </iframe> <!-- "Hide" button for the chatbot --> <button id="hide-bot-button" style="position: fixed; bottom: 290px; right: 20px; z-index: 1001; padding: 8px 16px; color: white; border: none; border-radius: 5px; cursor: pointer; box-shadow: 0 2px 6px rgba(0, 0, 0, 0.2);"> ❌ </button> <script> // Get the customer service chatbot iframe var botIframe = document.getElementById('customer-service-bot'); // Get the "Hide" button var hideButton = document.getElementById('hide-bot-button'); // Listen for the page load event window.addEventListener('load', function() { // Make the iframe visible by changing its opacity botIframe.style.opacity = '1'; }); // Attach a click event listener to the "Hide" button hideButton.addEventListener('click', function() { // Hide the iframe botIframe.style.bottom = '-330px'; // Hide the "Hide" button itself hideButton.style.display = 'none'; }); </script> -
Save Changes: Apply your edits to integrate the chatbot into your store.
Optimizing Your Shopify Chatbot for Maximum Impact
Ensure your chatbot’s success by:
- Brand-aligned Customization: Adapt the chatbot’s tone to fit your brand identity.
- Frequent Updates: Keep your chatbot informed with the latest products and FAQs.
- Customer Interaction Analysis: Analyze customer questions to continually refine your chatbot’s knowledge base.
Advanced Features for a Smarter Chatbot: Training with Shopify Product Data
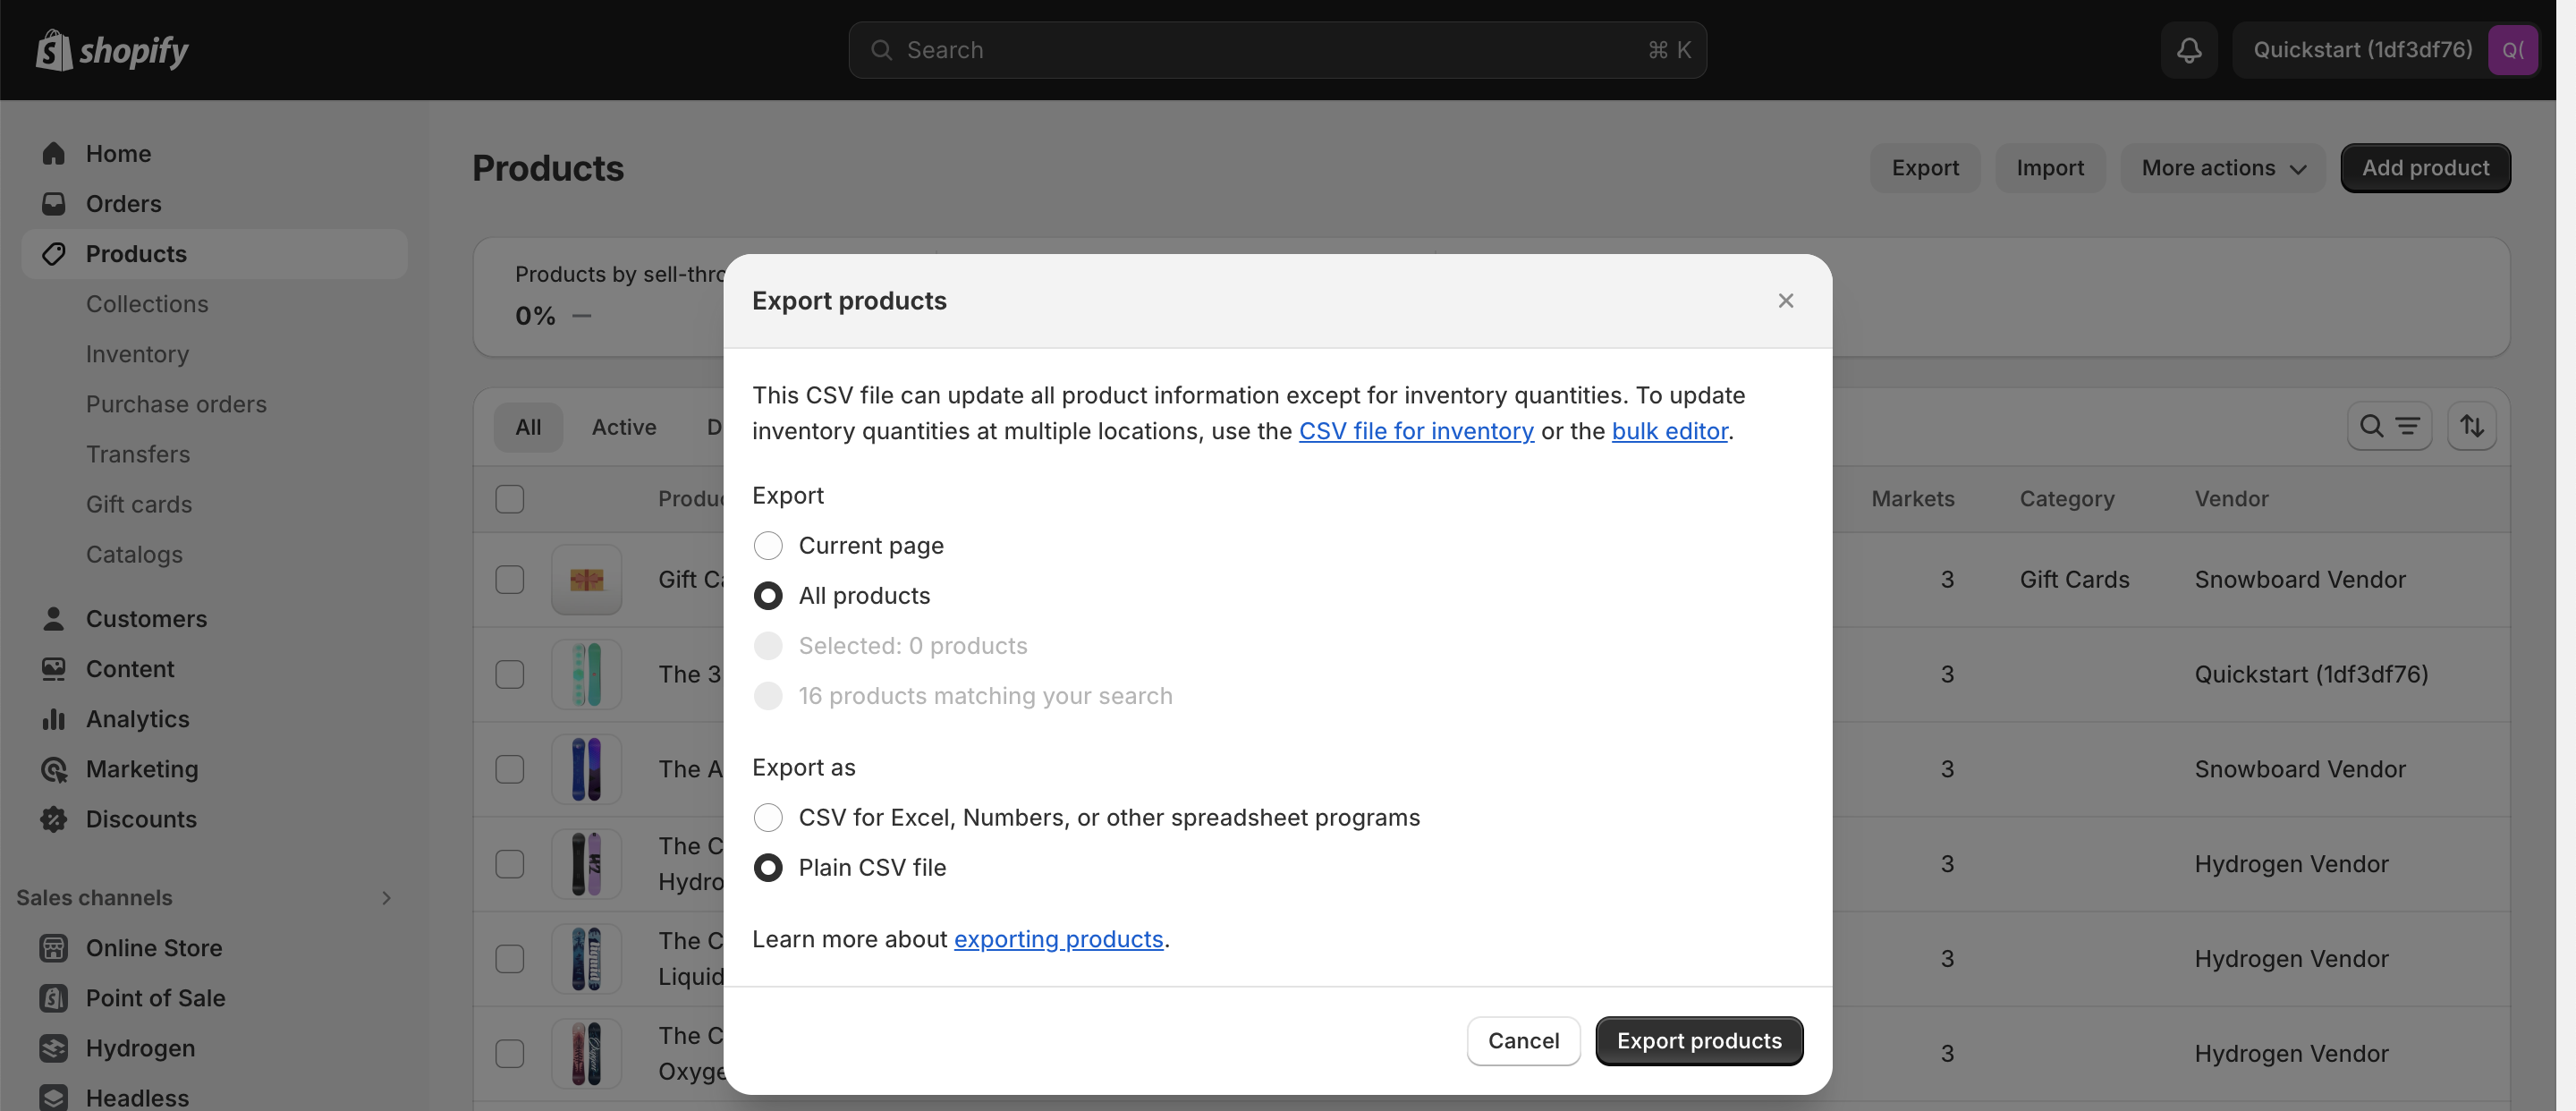
Exporting Product Data
From the Shopify admin page, go to products and select export to download your product data in a Plain CSV file format.
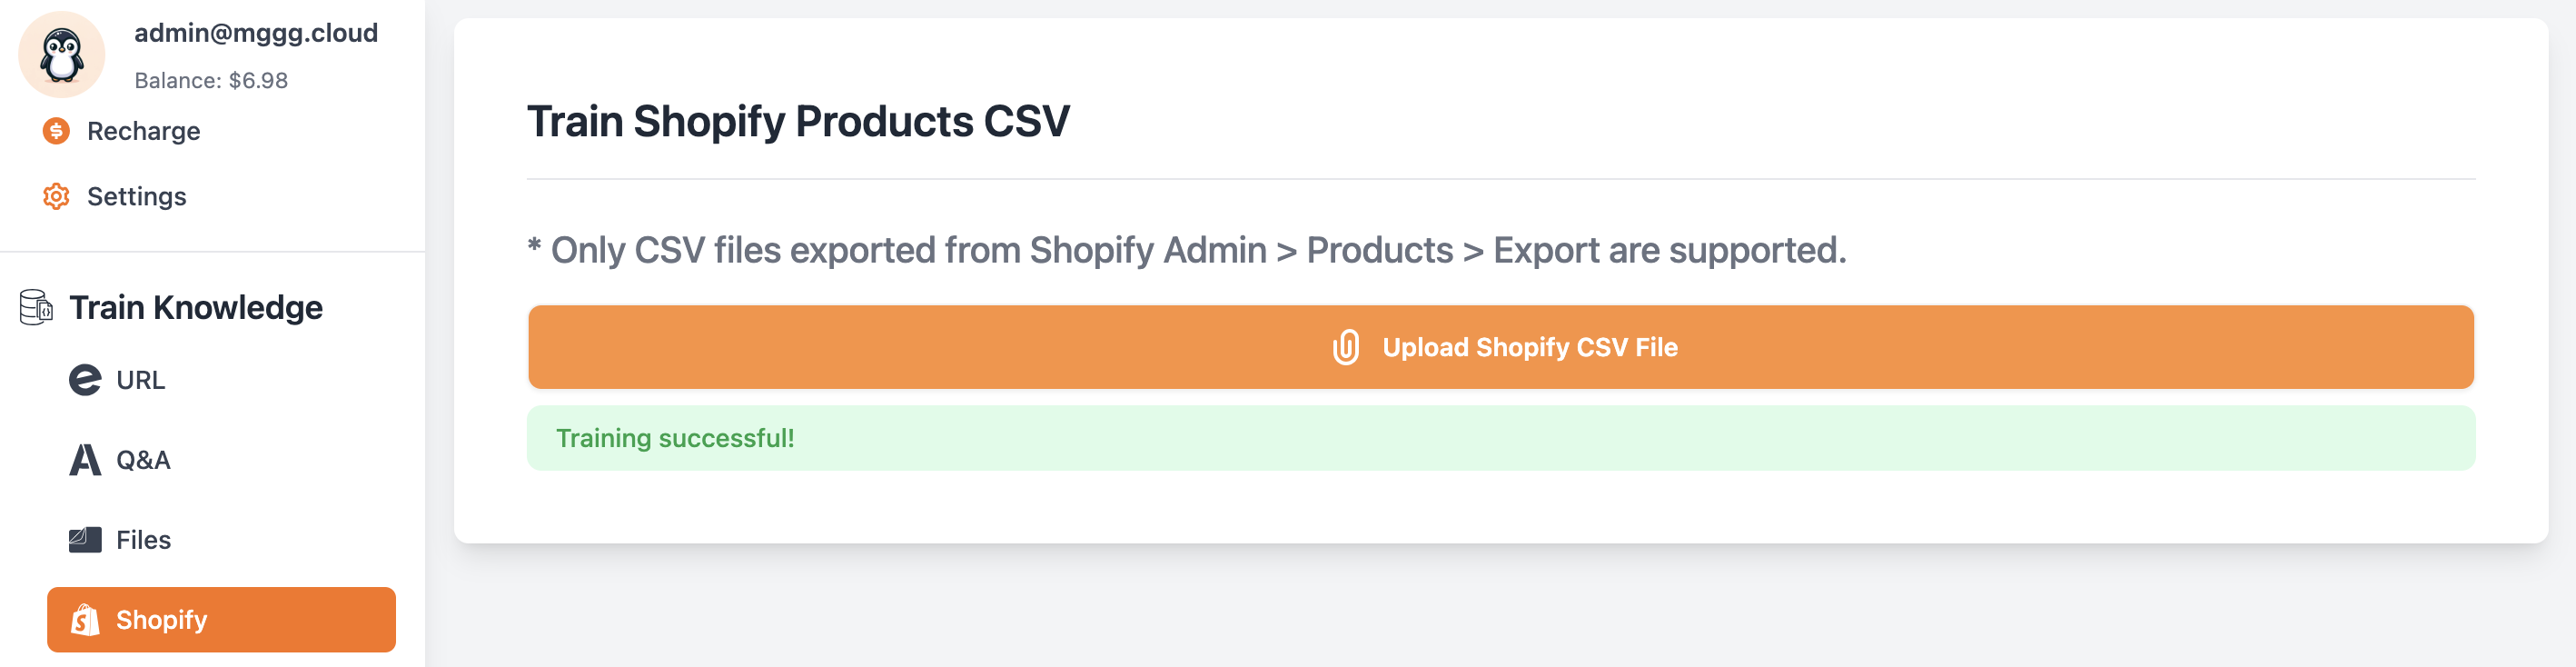
Training Your Chatbot with Product Data in Embed
Within Embed, select the Shopify training option, upload your CSV file, and wait for the training to complete successfully.
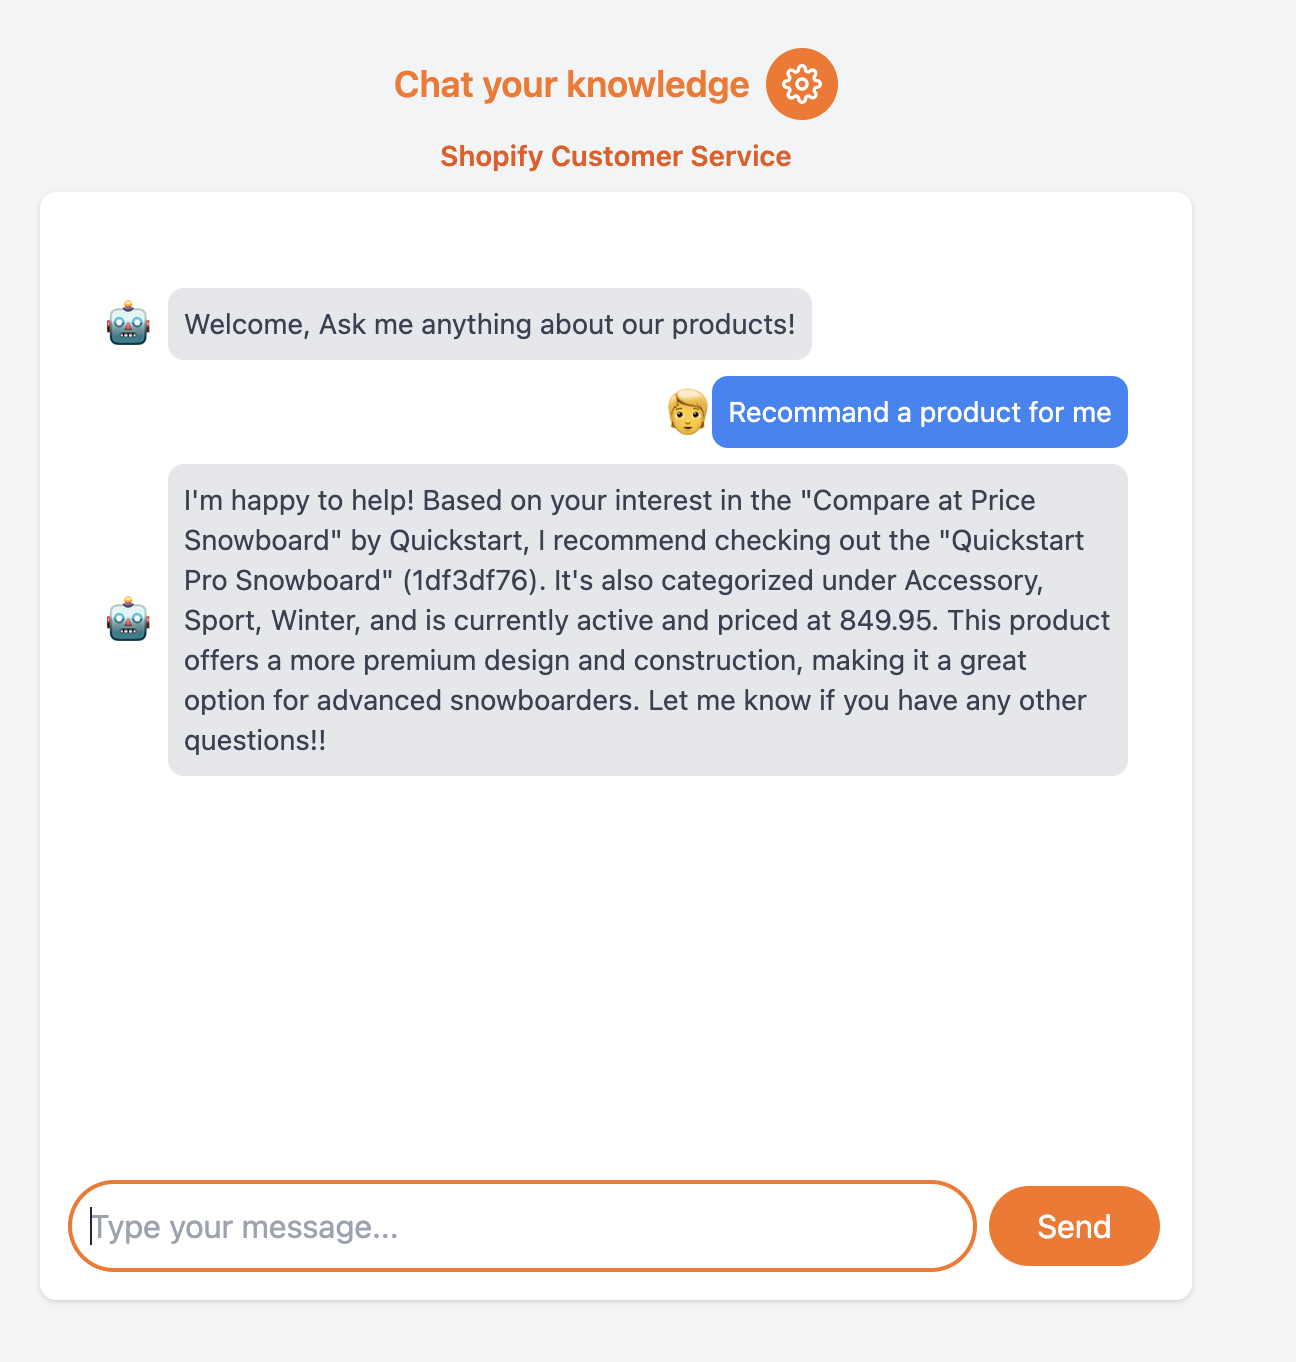
Testing the Enhanced Chatbot
Test your chatbot’s knowledge by asking it to recommend products, verifying its ability to utilize the trained product data.
Conclusion
For additional support, reach out to [email protected].